|
Article ID: 117
Last updated: 09 Sep, 2019
Introduction Currently, macOS does not support Multi-stream Transport (MST) technology which allows a computer to connect to multiple displays through a single cable. Therefore, in order to run a dual monitor setup for a Mac computer, customers have to either use an external USB graphics dock or a Thunderbolt 3 dock. An external USB graphics dock renders video externally and requires drivers to work. The video data is compressed and transmitted through USB and since it is not a native signal from the GPU, it consumes a lot of CPU power. On the other hand, Thunderbolt 3 docks transmit a native video signal but they are usually not cost effective and lack general compatibility. Thunderbolt 3 docks only work with Thunderbolt 3 enabled computers. They are not compatible with USB-C ports that do not support Thunderbolt 3 technology. This innovative USB-C dock perfectly solves the issue by utilizing two USB-C ports on the Mac computer to deliver up to dual 4K 60Hz native video from the GPU to dual monitors. It is a cost effective alternative to a Thunderbolt 3 dock and is universally compatible with USB-C ports with video capability as well as Thunderbolt 3 ports. Since it requires two USB-C ports for a dual monitor setup, the one port MacBook is not supported for dual display. The supported models are
Connecting to displays with DVI / VGA / DisplayPort using HDMI video converter adapters: Connecting to DVI/VGA/DisplayPort displays through an HDMI to DVI/VGA/DP adapter is supported. The maximum resolution will be limited at 1920x1080 @ 60Hz for VGA and DVI. HDMI to DP can do up to 4K. IMPORTANT NOTE: Most DisplayPort to HDMI cables are unidirectional and can only convert a DisplayPort signal to HDMI, and not in the other direction. Therefore most DP to HDMI cables will not work in this setup, you must use the adapter linked above. Similar thing goes for HDMI to VGA cables. Symptom: The Docking Station is not recognized or one or more ports is not functional Unplug all cables and peripherals, restart the computer, and then reconnect everything. Please also make sure the correct connection is being used. There are three USB-C ports on the dock. Two USB-C ports are located on the back panel. These USB-C ports must connect to the USB-C ports on the laptop. The main "Dock In" USB-C port controls the main display and all other I/O including laptop charging, USB ports, card reader, Ethernet, and audio. The 'Second Video In' is dedicate for the second monitor There is one more USB-C port located on the front panel. It is for connecting USB-C peripherals including hard drives, flash drives, smartphones, etc. It also provides 15W fast charging to smartphones with USB-C. Symptom: Unable to achieve dual 4K 60Hz video output The dock features an innovative bandwidth control switch which gives the users the flexibility between video and data. When set to 4K 60Hz mode, the maximum resolution supported are listed below.
In this mode, since most of the bandwidth is used for video, the USB ports, Ethernet, and card read speed will be limited at 480Mbps (USB 2.0 speed). When set to 4K 30Hz mode, the maximum resolution supported are listed below:
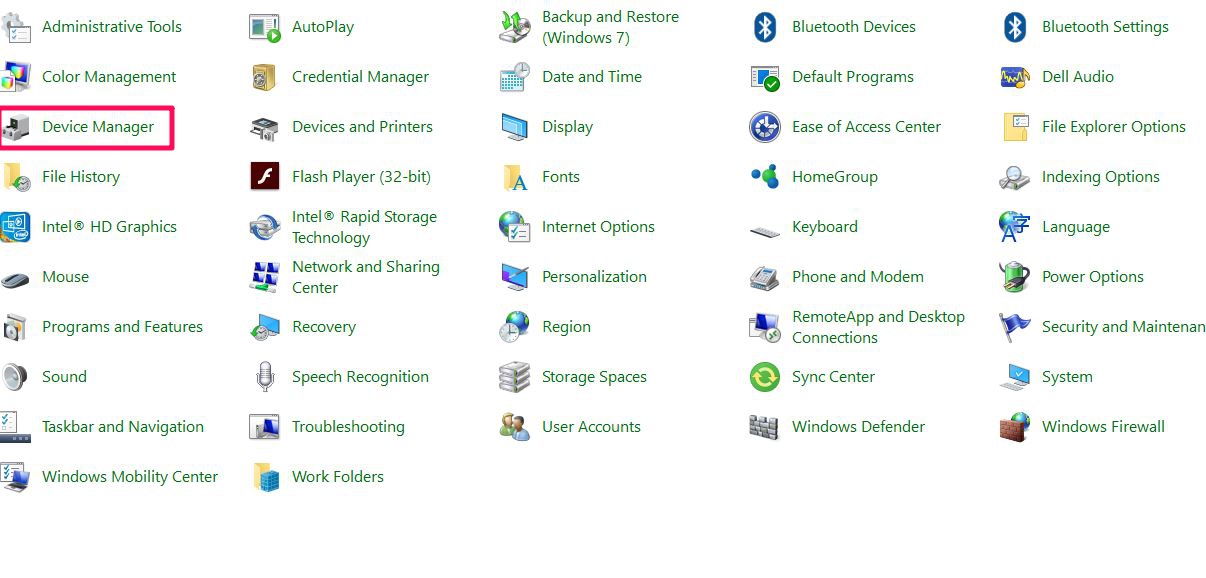
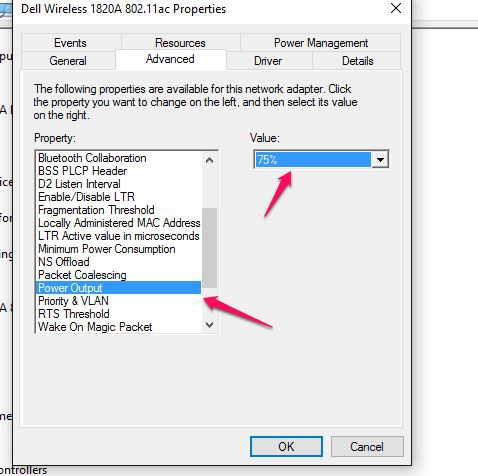
In this mode, bandwidth is shared between data and video. The USB ports, Ethernet, and card read speed run at full speed (up to 10Gbps). Symptom: Mouse lag or missing keystrokes when connecting a wireless mouse/keyboard to USB 3.0 The 2.4 GHz band is a widely used unlicensed radio frequency band for devices such as wireless routers and wireless PC peripherals such as a mouse or keyboard. USB 3.0 has a 5 Gbit/s signaling rate. The noise from the USB 3.0 data spectrum can create a conflict in the 2.4–2.5 GHz range. This noise can radiate from the USB 3.0 connector on a PC platform, the USB 3.0 connector on the peripheral device, or from the USB 3.0 cable. If the antenna of a wireless device operating in this band is placed close to any of the above USB 3.0 radiation channels, it can pick up the broadband noise and cause interference. This may result in a decreased throughput on the wireless link. The solution is to connect the wireless mouse / keyboard dongle to the USB 2.0 port on the back of the dock where the mouse/keyboard mark is located. If this still does not solve the issue, try using a USB 2.0 extension cable like this one: Symptom: Computer does not charge or charges at a reduced speed This Docking Station can pass up to 80 watts of power to the computer. Some MacBook Pro models require more than 80 watts and will be charged at maximum of 80W. Symptom: Ethernet connection not recognized or stopped working Please refer to the article below to troubleshoot the Ethernet. https://kb.cablematters.com/index.php?View=entry&EntryID=107 This USB-C dock also works with Windows PCs. If a Windows computer is used with this dock, check steps below for troubleshooting. Symptom: The Docking Station is not functioning properly on a Windows computer with Thunderbolt 3. Symptoms include no video, flickering video, or an unstable USB peripheral connection. Solution: Update BIOS, Thunderbolt 3 firmware, Thunderbolt 3 driver, and Intel Graphics Driver from the manufacturer website. For more details, refer to articles below: BIOS, Firmware and Driver Updates Symptom: Ethernet keeps disconnecting with certain Dell computers. Some Dell XPS and Precision models may contain a version of internal Wi-Fi adapters that interfere with the Ethernet connection over USB-C. This issue can be resolved by lowering the power output of the onboard Wi-Fi adapter. 1. Navigate to Control Panel > Device Manage 2. Select Network adapters. Right-click on the Dell wireless adapter. 3. Select Properties. Click on the Advanced tab. Select Power Output and select 75%. 4. Disconnect the cables and multiport adapter, restart the computer, and reconnect everything. Symptom: Audio is not transmitted to monitor through HDMI Some monitors do not have built-in speakers. Therefore, audio must be transmitted separately. If audio is supported, please follow the steps below to select the correct playback device: Windows: 1) Open the 'Sound' menu by searching or right clicking the sound icon on the taskbar 2) In the Playback Tab, select the display with HDMI 3) Click Set Default 4) Click OK to save the settings
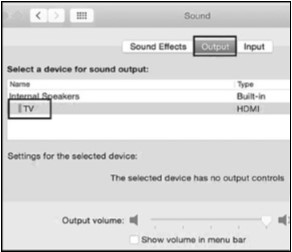
MacOS: 1) Open the Apple Menu and go to System Preferences 2) Click the Sound icon 3) Click the Output tab 4) Select the display with HDMI
For more information about our USB-C products including drivers and user manuals, please visit the USB-C page on our website
Article ID: 117
Last updated: 09 Sep, 2019
Revision: 8
|


