|
Article ID: 83
Last updated: 09 Sep, 2019
System requirement Not all USB-C ports support all features of USB-C. Some computers and smartphones only support data over USB-C for external storage such as flash drives while some devices support video and charging over USB-C. Check the below article about the USB-C port capability. If you are not sure, please consult the manufacturer for this information. http://kb.cablematters.com/index.php?View=entry&EntryID=86 Symptom: The adapter is not functioning properly on a Windows computer with Thunderbolt 3. Symptoms include no video and flickering video. Solution: Update BIOS, Thunderbolt 3 firmware, Thunderbolt 3 driver, and Intel Graphics Driver from the manufacturer website. For more details, refer to articles below: BIOS, Firmware and Driver Updates Symptom: The adapter is not recognized Unplug all cables, restart the computer, and then reconnect everything. Symptom: HDMI does not work at full 4K 60Hz resolution The adapter supports HDMI 2.0 resolution up to 4K at 60Hz. You will need a 4K 60Hz rated computer, HDMI cable, and display to take advantage of HDMI 2.0 bandwidth. Some smartphones and laptops such as the LG G5 (1080p) and 12" MacBook (4K@30hz) do not support 4K at 60 Hz video out. Some displays have multiple HDMI inputs and not all of them are HDMI 2.0 capable so test each HDMI input. Symptom: Adapter stops outputting full 4K 60Hz resolution after upgrading to macOS 10.14 Mojave. Refresh rate is capped at 30Hz. Please refer to the article below to enable 60Hz in macOS 10.14 Mojave. https://kb.cablematters.com/index.php?View=entry&EntryID=111 Symptom: Audio is not transmitted to monitor through HDMI Some monitors do not have built-in speakers. Therefore, audio must be transmitted separately. If audio is supported, please follow the steps below to select the correct playback device: Windows: 1) Open the 'Sound' menu by searching or right clicking the sound icon on the taskbar 2) In the Playback Tab, select the display with HDMI 3) Click Set Default 4) Click OK to save the settings
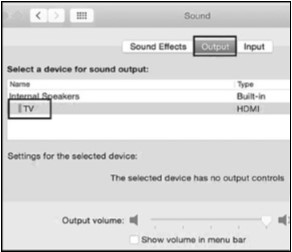
MacOS: 1) Open the Apple Menu and go to System Preferences 2) Click the Sound icon 3) Click the Output tab 4) Select the display with HDMI
For more information about our USB-C products including drivers and user manuals, please visit the USB-C page on our website
Article ID: 83
Last updated: 09 Sep, 2019
Revision: 10
Tags
|

